Why a 3d Printer?
3D Printing is awesome.
Thingiverse,
Youmagine and
yeggi are great sites where many 3d models are available for free and if you have a 3D printer you can make these parts at home. Have a look there and just glimpse the possibilities.
3D Printing is a challenging and has a steep learning curve. I bought my first 3D printer 4 months ago. It is a
Prusa i3 Rework. Prusa i3 is the the most widely used DIY printer out there, and the most likely printer to be a bought by someone who is trying to jump into 3D printing.
3D Printers are not "THAT" expensive anymore. In fact, in this build I will try to remain below the Rs 25,000.
So, if want the power to create 3D objects on your desktop then start your journey on the
Third industrial revolution.
 |
| My Prusa i3 Rework. Just an example of the things that you can print. At the back the translucent white box is converted into a custom airtight filament holder for my 3d Printer using my 3d Printer to build its parts. RepRap indeed!! |
Why iTopie?
3d Printing requires precision and repeat-ability. Usually, the cheap DIY printers are made of acrylic frames, which are prone to bending under stress and cracks. My current printer has an 8mm acrylic frame, which provides great stability. But acrylic is prone to bending under stress and cracking. In hindsight, because Prusa i3 was my first DIY 3d printer, I tightened the screws tighter than they were meant to be tightened, resulting in cracks. Now, the stress of printing is slowly making the cracks wider :(
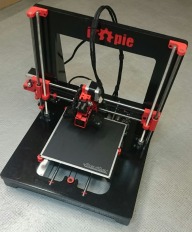
Which brings me to iTopie. iTopie's unique frame is made entirely of MDF. Medium Density Fiber is denser than plywood and has high structural integrity, which means it doesn't bend easily. MDF boards are widely available in India, in fact some of your furniture might be made of MDF. Another benefit is the quicker assembly time compared to other Prusa i3 variants.
This means iTopie can theoretically print at a better quality at higher speeds.Which sounds awesome, considering how slow the whole process can be.
Getting Started
Build Manual and Parts List
In these series of blogs, I plan to make a iTopie printer, from scratch using components easily available in India. The printer itself is very easy to build. All you need is some Fevicol SR, A Drill machine (with 3mm drill bit), some drywall screws, a can of spray etc. I have ordered parts from the
Bill of Materials/Parts List,
I will share my own BOM in the coming posts. Most of the parts have been ordered online from Indian stores and remaining from Alibaba Express. The aim is to make a Rs 25000 printer.
I will follow the RepRapWiki's Build Manual for iTopie (
here) . I plan to document the variations in the original Build Manual due to lack of compenents in India or in generally to me. Partial list of differences are following, more will be documented as they arise:
- I cut the frame using 18mm MDF, instead of 16mm used in the original design. Its was easy to generate the new DXF files for 18mm MDF and 6mm pocket size. I just followed the instructions given on the Wiki. This was because 18mm frames very easily available in India. I used Greenply weather proof MDF.
- Using RAMPS+ARDUINO MEGA electronics instead of Smoothieware board
- Maybe, will get an enclosure for the printer. (??)
Getting the iTopie Frame CNCed
Before I could do anything, I had to get the MDF routed to make the iTopie frame.You need access to a CNC machine to be able to do that. But don't worry, many Indian cities have facilities for CNC routing. Since, I live in Bangalore, I looked around for a local CNC Shop and found
this site. This woodwork shop is run by a great guy, Chandrakanth. I visited their shop to discuss the design 3 days back and I have already received pics of the finished frames. It has all been very professional and satisfying.
 |
| A freshly minted iTopie frame in Bangalore. Cant wait to receive it from the workshop. |